09.02.23
How to build a Mobile Scaffold Tower
Before you start
- This guide is no substitute for being competent & qualified. We recommend the course PASMA Towers for Users
- Check the ground conditions - is it solid & flat? Mobile Scaffold Towers must be erected on no more than a 1% slope
- Segregate the tower from the rest of the site to help prevent unauthorised persons interfering with the tower or plant machinery colliding with it
- Check the weather forecast if building a tower outdoors. Windy conditions are not appropriate for erecting scaffold tower
- Check the area for obstructions. Tower is conductive so beware of electrical cables
- Towers must always be climbed from the inside, up the built-in ladders
- The safe working load of City Hire's tower is 2,000kg including the weight of the tower. The trap platforms can take a load of 282kg evenly distributed
- Two people are required to erect tower
- Each tower should be inspected every 7 days
- Take measures to prevent unauthorised persons from accessing the tower
- This guide is not suitable for other scaffold tower types, e.g. Advanced Guardrail, Lift Shaft, Stairwell Tower etc.
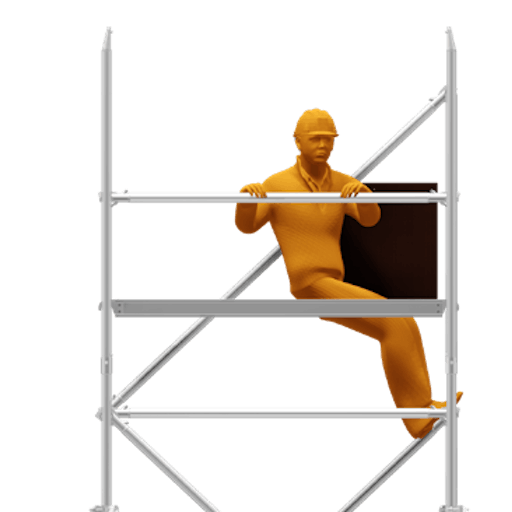
The 3T Build Method Explained (Through the trapdoor)
The “3T” or “through the trapdoor” method is one of the two permitted ways of assembling a tower without the assembler being at risk of falling. This tower is a 3T tower.
As each new level of platform is installed, the operative takes up a working position in the trap door of the platform, standing on the ladder and leaning back against the edge of the trapdoor aperture.

From this position, the operative fits the horizontal braces 500mm and 1000 mm above the platform level (i.e. on the 2nd and 4th rungs above the platform). If the far end of the guardrail braces don’t fully engage when they are put in place, the operative fully engages it when first climbing up onto the platform. This process ensures that operatives never have to stand on an unguarded platform.

Step 1: Insert Castor Assembly
Insert the leg & castor assembly into the base of the first main frame and ladder frame. When fully inserted, ensure the spring loaded pin is engaged into the hole in the side of the frames. Ensure all 4 wheels have the brakes applied.

Step 2: Connect Horizontal Braces to uprights
Connect 2 horizontal braces to the uprights of the first frame in the area below the bottom rung. Make sure that the braces are connected from the inside of the tower facing outwards. Make sure that the frame head fittings are pointing inwards into the tower. Each brace has a spring loaded catch on each end, it's important to make sure that this catch is extended when clamped on the frames.

Step 3: Connect second frame
Connect the 2nd frame to the horizontal braces in the same position that they are located on the first frames. Make sure that the frame head fittings are pointing inwards into the tower.

Step 4: Connect Diagonal Braces
Connect 2 diagonal braces to the frames as shown. Keep the diagonal braces as close to the frame uprights as possible. Ensure that they run in opposite directions to each other. Ensure that the claw at each end of the brace is facing downwards.

Step 5: Fit Trap Platform
Install a trap platform on the 2nd rung up and 4 horizontal braces as guard rails. Using a spirit level, ensure that the framework is completely level by adjusting the legs. Twist the serrated collar above the wheel to adjust up & down.

Step 6: Fit Stabilisers
Once the framework is in position and level, connect 4 stabilisers to the corners. Fix the shorter arm to the lowest part of the frame, then connect the longer arm to the upper part, ensuring the foot is firmly placed on the ground. Small vertical adjustments can be made to either arm to guarantee a sturdy placement. It's important that each stabiliser is firmly pressed against the ground.

Step 7: Add additional frames
Working from the temporary platform, install a 2 rung main frame & a 2 rung ladder frame onto the 4 rung frames. Then, clip onto the top rung a diagonal brace. Diagonal braces always run parallel to the braces below.
Install another 4 guard rails above the 4 already in place for when the platform is relocated.

Step 8: Install additional braces
Remove the lower 4 guardrails by using the 3T method or uninstalling them from the ground. Relocate the platform to the top rung of the first frames. If a 2.2m tower is being assembled, go straight to Step 10. From this new platform position, install a 4 rung frame and a 4 rung ladder frame. Clip on one standard diagonal brace on the same side of the tower as the one form step
7.1. The start position of the brace should be on the same rung height as the finishing position from the brace below - running in the same parallel direction.

Step 9: Fit another Trap Platform
Install a trap platform 4 rungs above the previous platform. Using the 3T method install 4 guardrails to the upper platform. This will set a 2m vertical distance between each platform.
Now, repeat steps 8 and 9 until the required platform working height is achieved. Once the final step 9 is complete, move to step 10.

Step 10: Insert Toeboard Set
Finally, working from the guard railed platform, install a toeboard, ensuring that the sides are hooked securely over the outside edge of both platforms.

Step 11: Add signage
After assembly or alteration, the following minimum information shall be displayed on the mobile access and working tower and be clearly visible from the ground (e.g. on a tower tag):
- The name and contact details of the responsible person
- If the tower is ready for application or not
- The load class and the uniformly distributed load
- If the mobile access and working tower is intended for indoors use only
- The date of assembly
Want to know more? refer to our guide 'Everything you need to know about Scaffold Towers'